Installation Guide
Unicorn Panel is under active development and this documentation is currently outdated.
Thank you for taking the time to use Unicorn Panel (UPCP). We've streamlined the installation process so that it's a simple as running a single command.
UPCP is a multi-server web hosting control panel built for Alpine. You can manage all your servers from a single server (the primary Control Panel). Adding a new server is as simple as copying and pasting a unique installation command generated by the primary Control Panel.
Hardware requirements
- A blank (no other software) VPS or bare metal server.
- Alpine v3.20 or above. We recommend the latest version of Alpine.
- A minimum of 500MB RAM and 5GB storage.
If you plan on using UPCP's email facilities, the recommended minimum RAM requirement is 1GB for that individual server.
All UPCP data including customer data is stored in /opt/upcp; customer mounts are located in /opt/upcp/containers and their disks are located in /opt/upcp/disks. You may parition off /opt/upcp or /opt/upcp/disks to maximize space on the server.
On any UPCP server, you can install a Backup role. Backups are automatically created on the server at /backups. This location can be a partition, network mount, external storage, etc.
Installation steps
The very first server you install UPCP on will be automatically designated as the Control Panel. We recommend using a provider with snapshot/backup capability for disaster recovery purposes.You can install UPCP for free. The free installation does not require a license key; however, it is limited to one server and a handful of applications. You must purchase a license key to unlock all features, including multi-server setups. With UPCP free, you can install NGINX, MariaDB, and PHP 8.x to power a single WordPress website.
- Login to your new server as root
-
Copy and paste the installation command into the terminal:
sh -c "$(wget -qO- https://unicornpanel.net/install)"
- Hit Enter. This will trigger the installation process.
- Wait for this process to finish and you will be presented with a link and login details to your administration account.
- If you're unable to visit the link presented to you, please make sure your firewall has port
8272 open. - Once logged in, navigate to Account -> My Account to update your admin details and change the password.
- If you forget your admin password, type
upcp upcp reset-admin-password ('upcp upcp' - not a typo) in your terminal to generate a new password. - If you have a license key, navigate to Admin -> Settings -> License and enter your key. After successful validation, the control panel will unlock all features.
Firewall Ports to Allow
During installation UPCP will automatically open ports. When you install roles, additional ports will automatically be opened. The following ports are used in Unicorn Control Panel:
If you plan on using any of the applications assigned to these ports, you may need to open them at a network-level firewall by your server provider.UPCP
Port 8727TCP must be open on all UPCP servers.
Applications
- 80
TCP - 443
TCPUDP - 22
TCP (SSH)
Database
Please be advised that opening the following ports is only necessary if your specific platform configuration demands external accessibility.- 3306
TCP - 3307
TCP (Used when a second database role is installed) - 5432
TCP (PostgreSQL)
DNS
Please be advised that opening the following port is only necessary if you intend to use the server as a Domain Name Server (DNS).Email
Please be advised that opening the following ports is only necessary if you intend to use the server as an Email Server.- 25
TCP - 110
TCP - 143
TCP - 465
TCP - 587
TCP - 993
TCP - 995
TCP
SMTP Settings
Emails generated by the control panel (such as forgot password) are unable to be sent until you set SMTP settings. You can set these settings at Admin -> Settings -> SMTP.
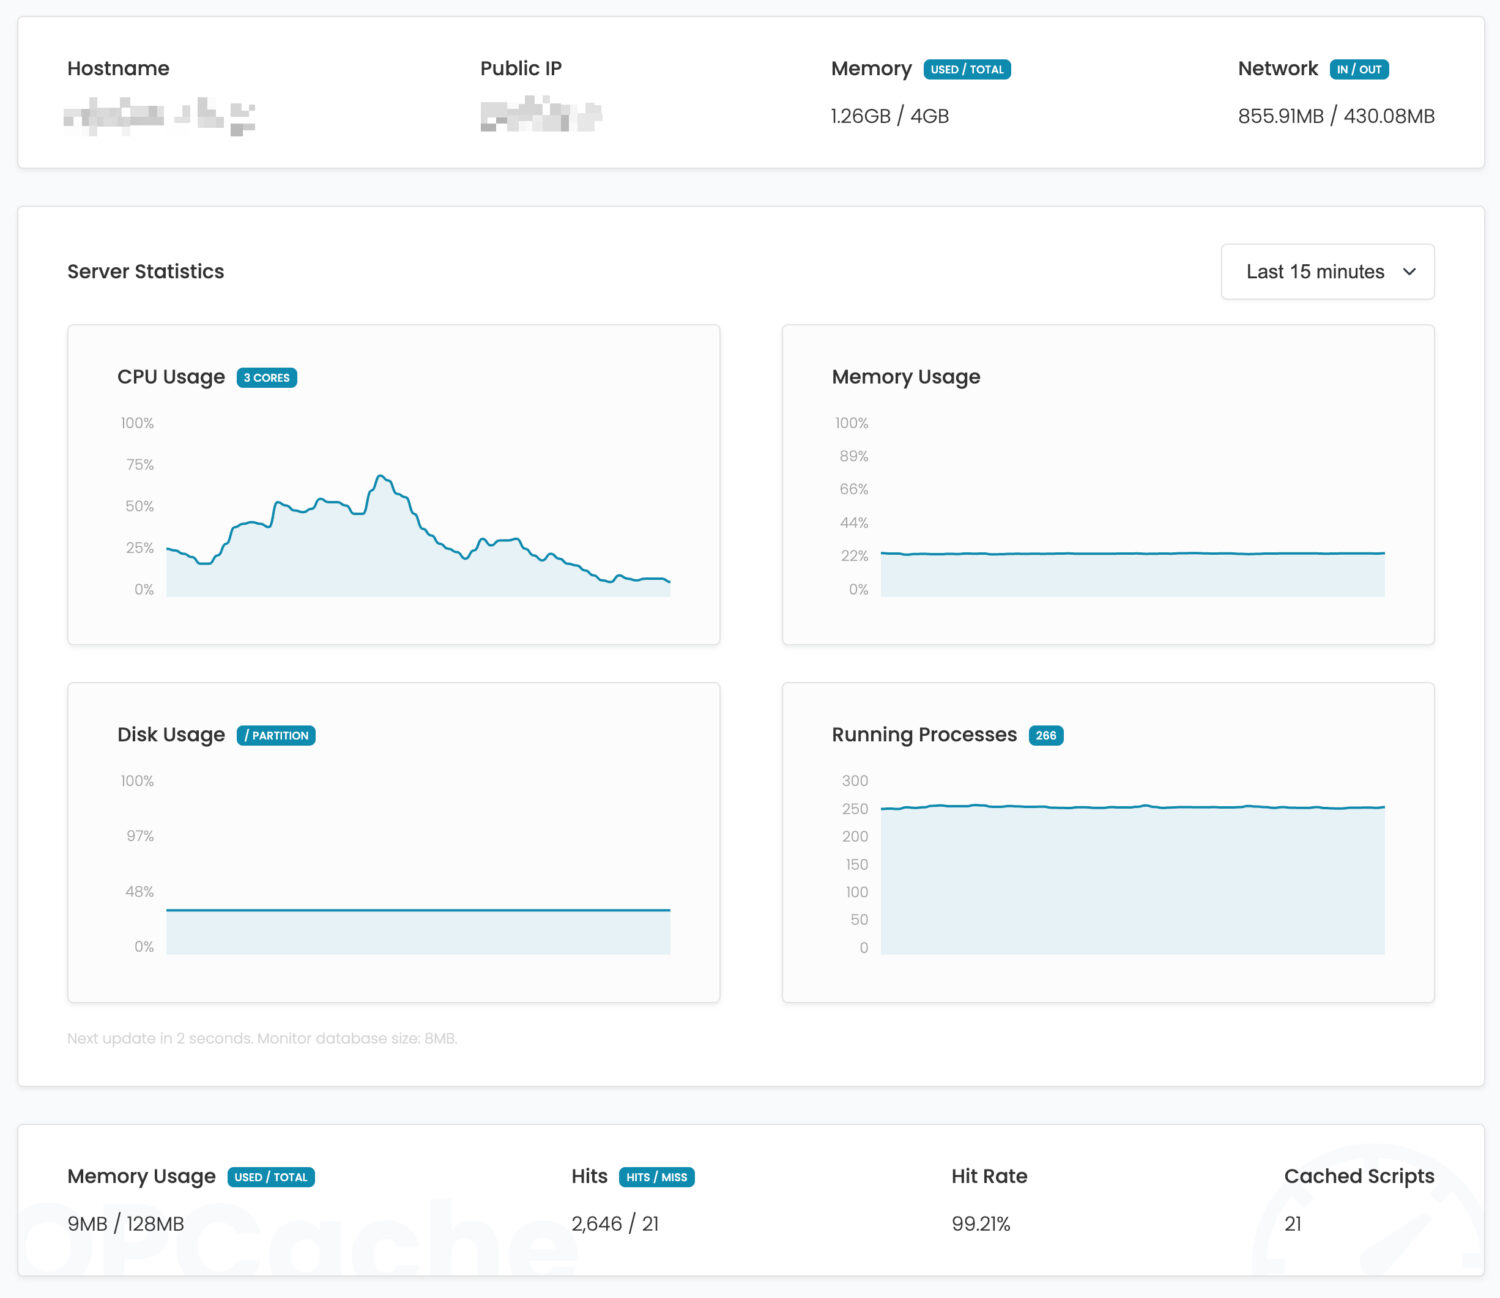
Overview
The Dashboard shows an overview of what's going on on the server. This includes information such as:
- Hostname
- Public IP Address
- Memory Usage (in text format and history graph)
- Network Usage
- Histoical CPU Usage
- Histoical Running Processes
- Histoical Disk Usage (Primary / Parition)
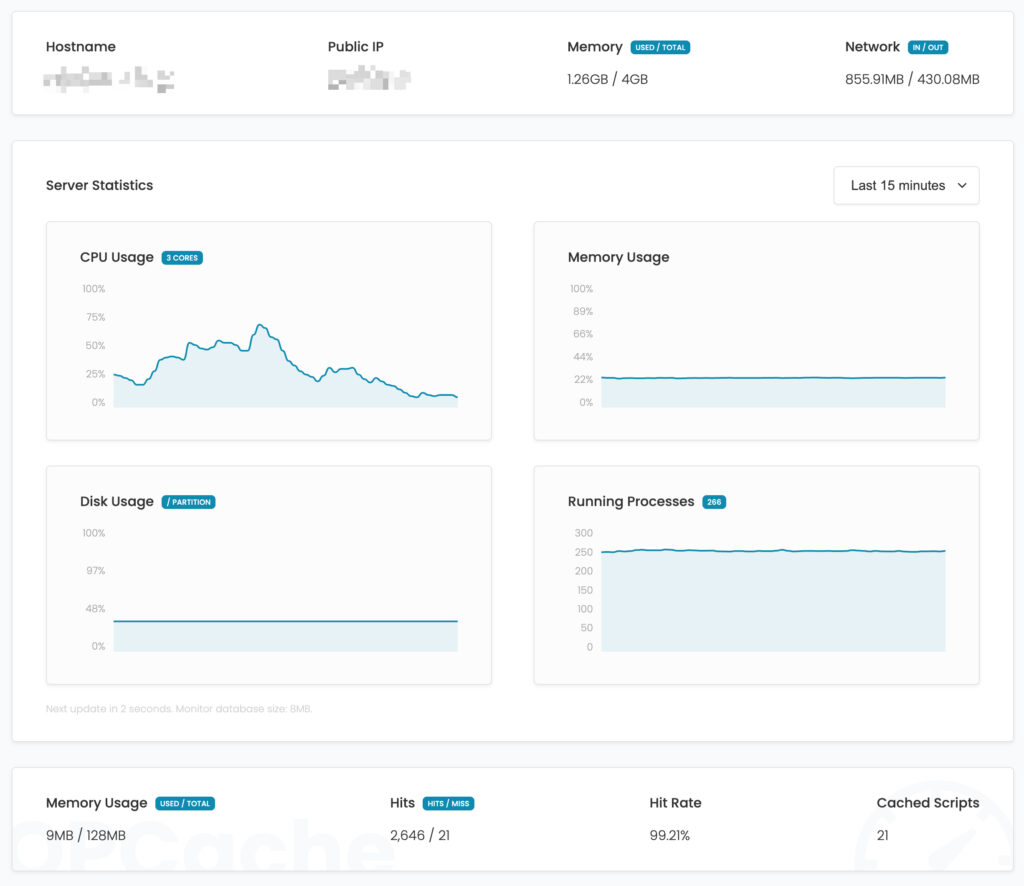
Historical data is only kept for 2 weeks to minimize the monitoring database. An average database size for 2 weeks is ~8MB.
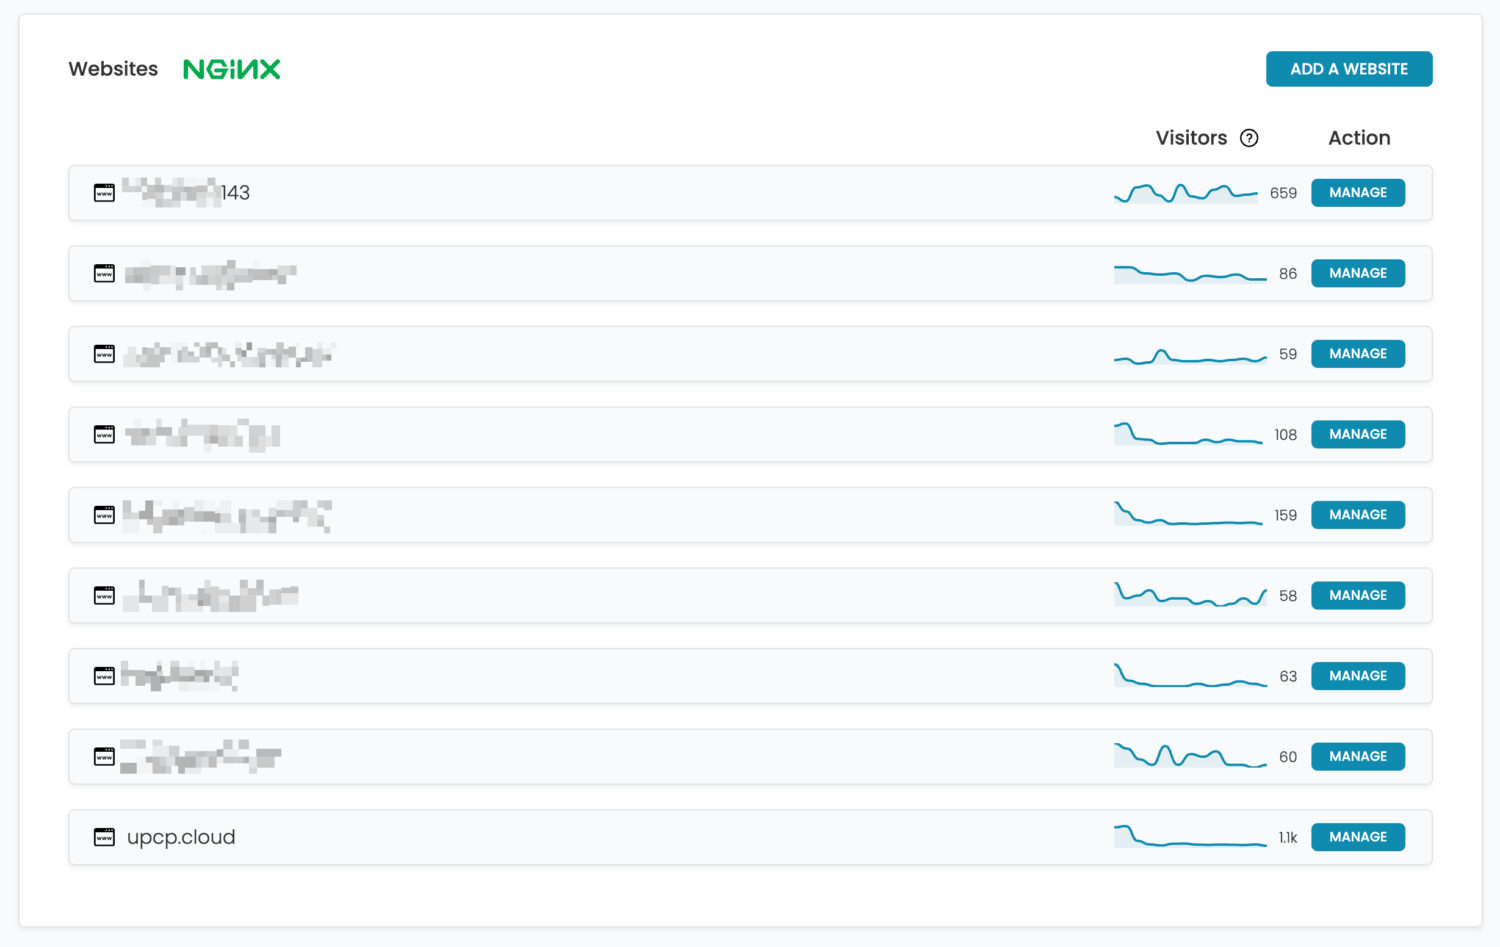
Overview
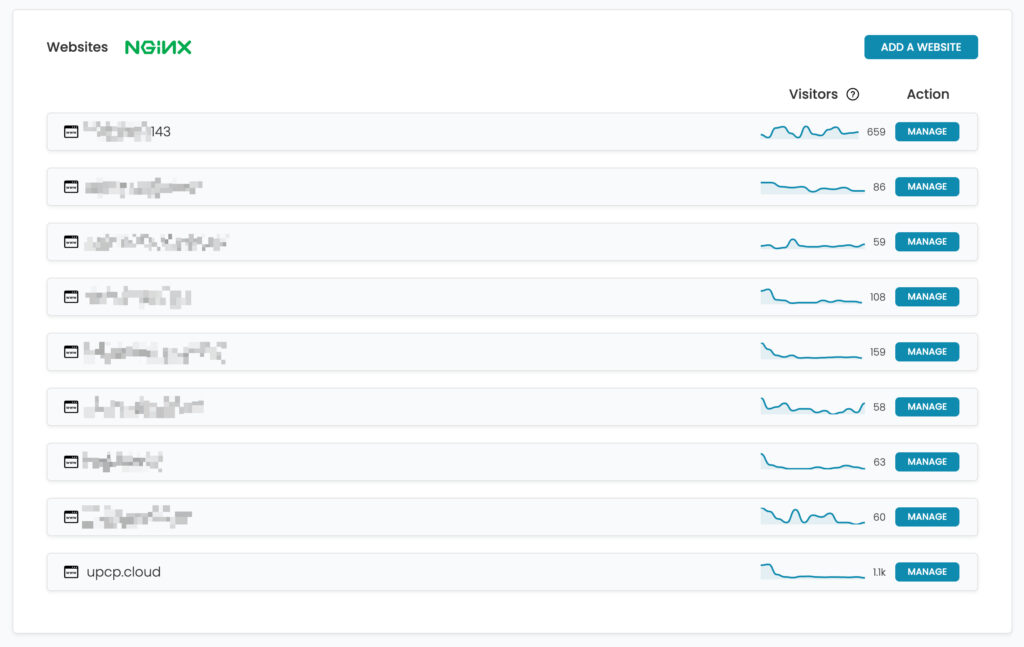
The Websites tab enables you to see a list of websites your account can see.
- For Owners, they will see every website.
- For Customers, they will only see what they have either created or been assigned.
Historical data is only kept for 2 weeks to minimize the monitoring database. An average database size for 2 weeks is ~8MB.
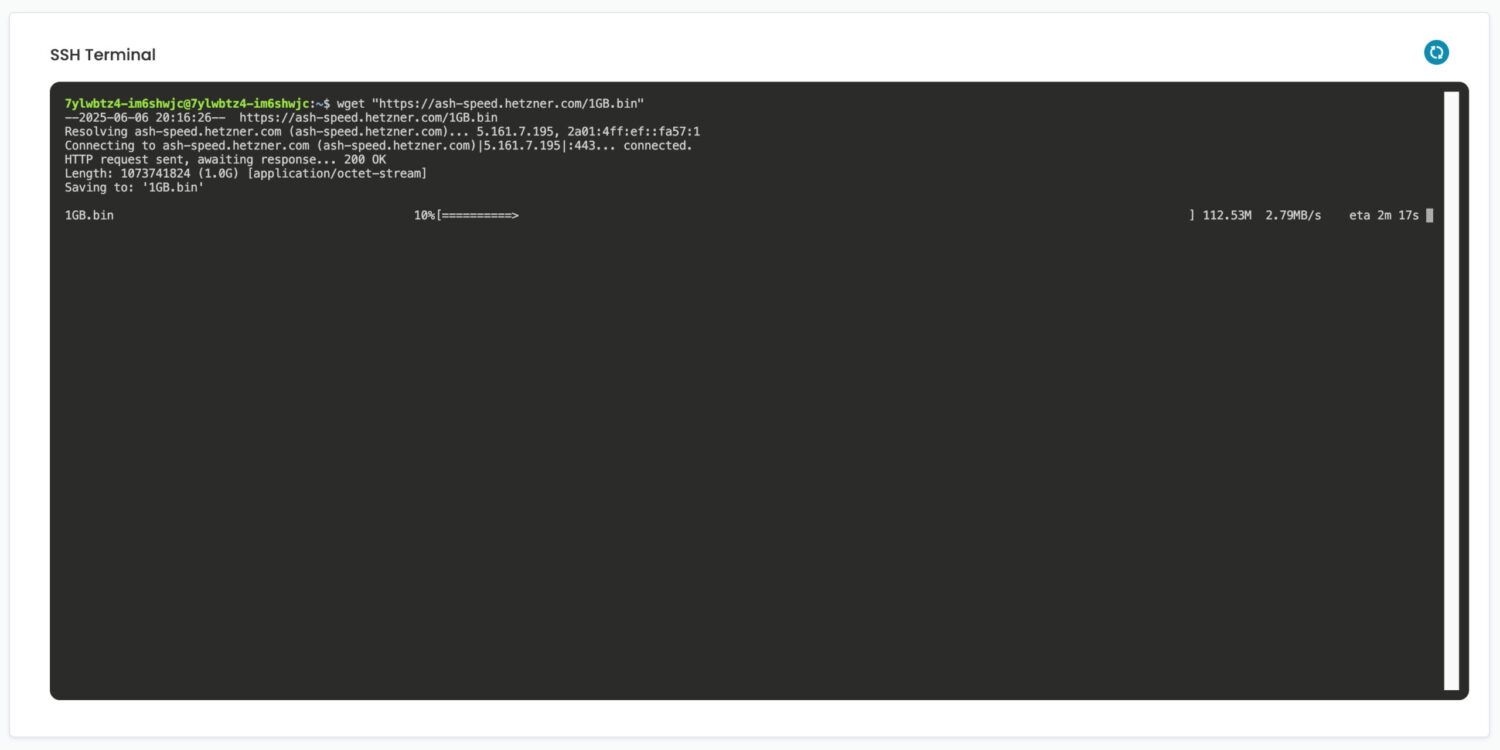
Web SSH Terminal
The terminal is a great tool for end users to securely access their container which contains their files. They also have power to restart their services from this container or install other software packages such as ffmpeg.
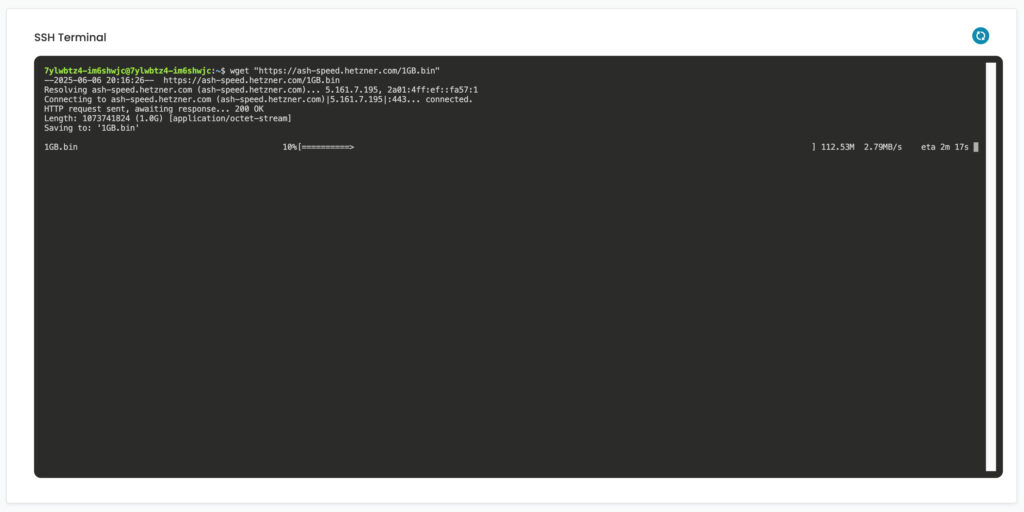
sudo & root access
The container is fully secure; this allows the end user to sudo into 'root' in this container to further manage it. For example, they may want to install ffmpeg and can do so by issuing the collowing command:
sudo apt install ffmpegThis would install ffmpeg inside their own container.
Remove sudo access
If you would prefer your customers to not have root access to their container, you can simply disable this option in the _config.php file by adding the following:
$_CONFIG['disable_customer_sudo'] = true;Please note, if any customers already have root access, you will need to remove a file within their container to block them:
rm /opt/upcp/containers/[WEBSITE_ID]/etc/sudoers.d/[WEBSITE_ID]Disable Web SSH Terminal
You can disable the Web SSH Terminal for customers by adding the following to your _config.php file:
$_CONFIG['disable_web_ssh_terminal'] = true;System Resources
x
Backups
x
Resource Limits
x
Logs
x
SEO Tools
x
Website Cache
x
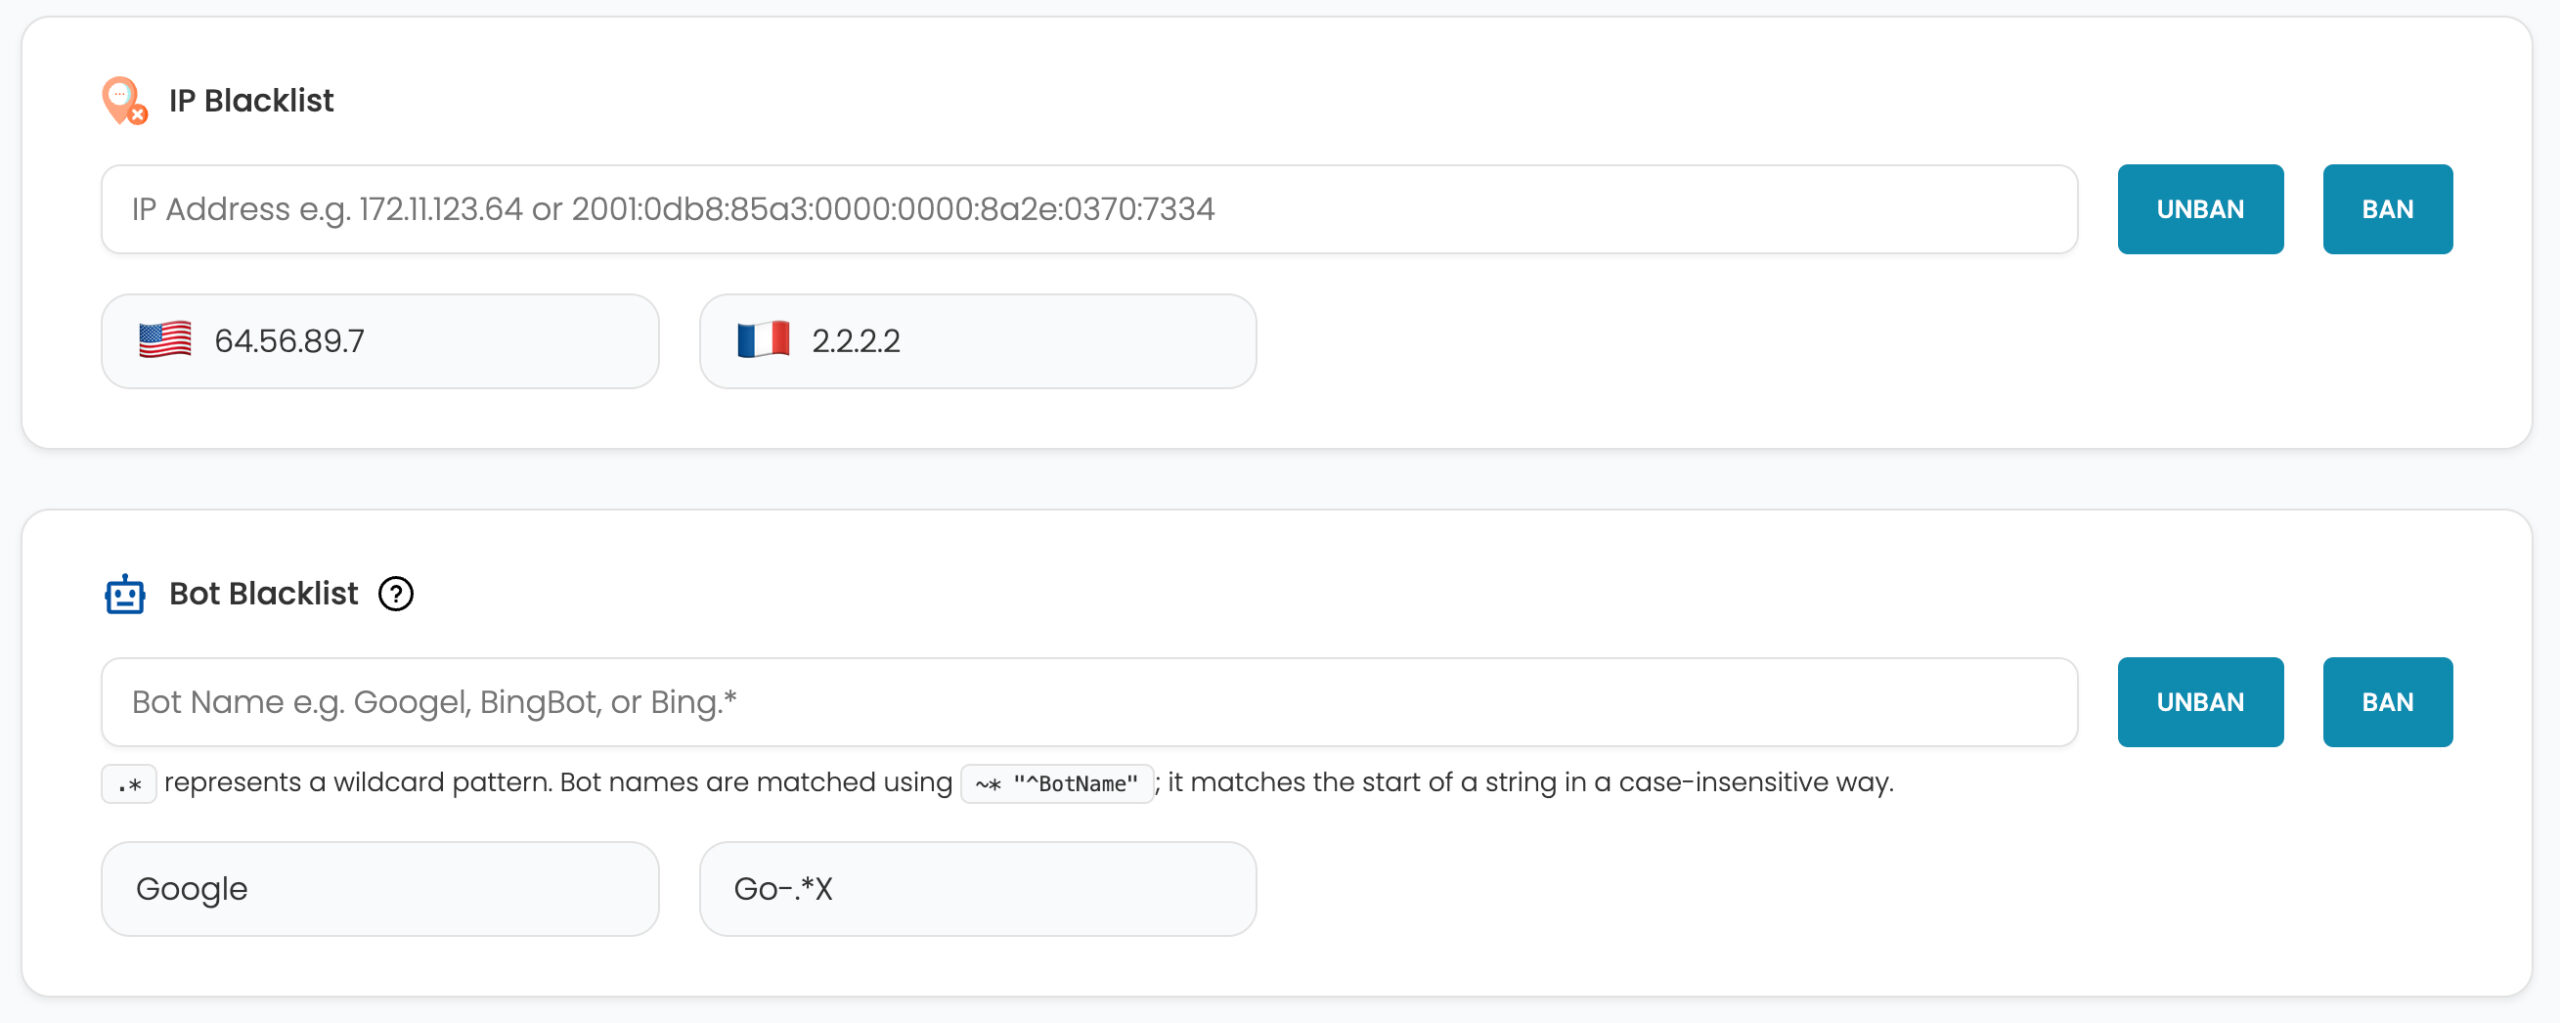
Security
The Security tab allows the website owner to control features related to security. They can:
- Ban and Unban IP Addresses or Bots (by name)
- Enable Basic Authentication to protect their website
- View details or renew their SSL Certificate
IP & Bot Blacklist
The website owner can block IP addresses and Bots direcly from the control panel. Simply add the IP address or Bot name and click the corresponding button for the action i.e. Ban or Unban.
 IP Addresses and Bot names are blocked on an individual website level. They have no effect on the global settings.
Basic Authentication
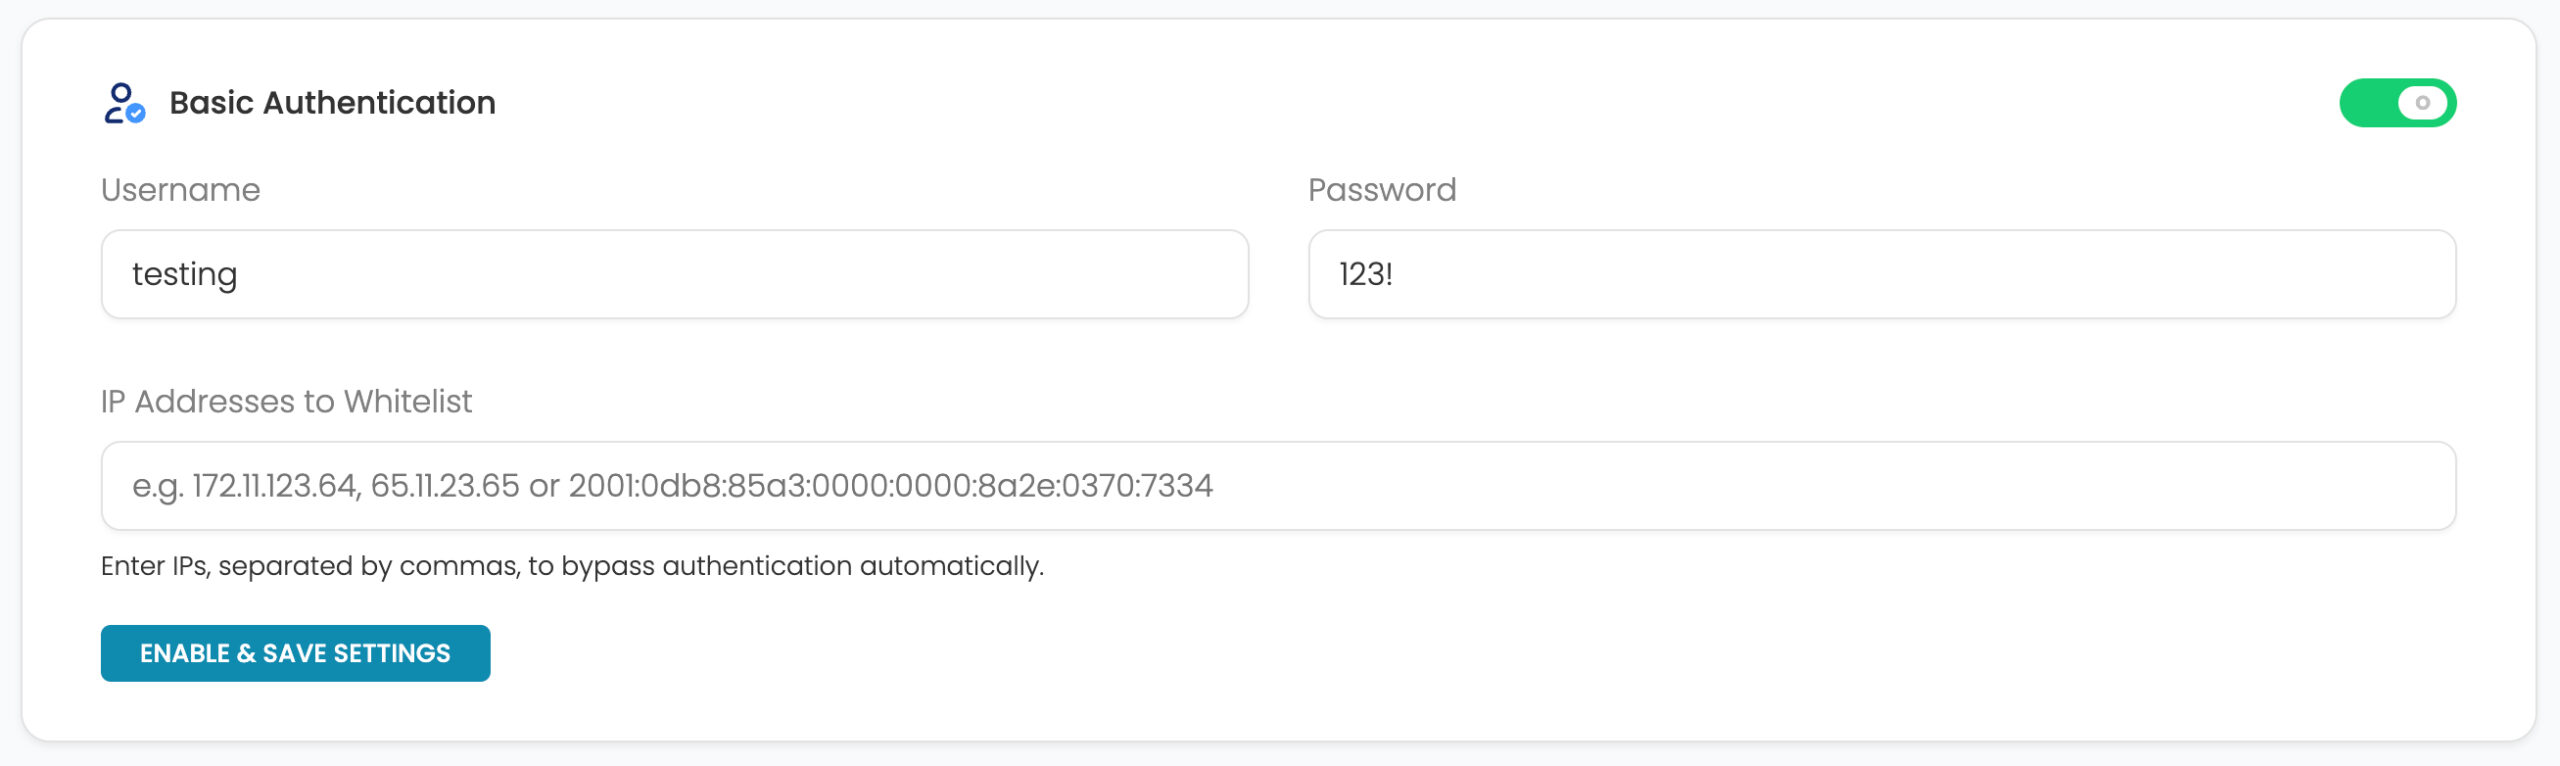
Users can protect their entire website using Basic Authentication. To enable this feature, simply toggle it on and enter a username and password. Users can bypass the username and password by entering a valid IP address.

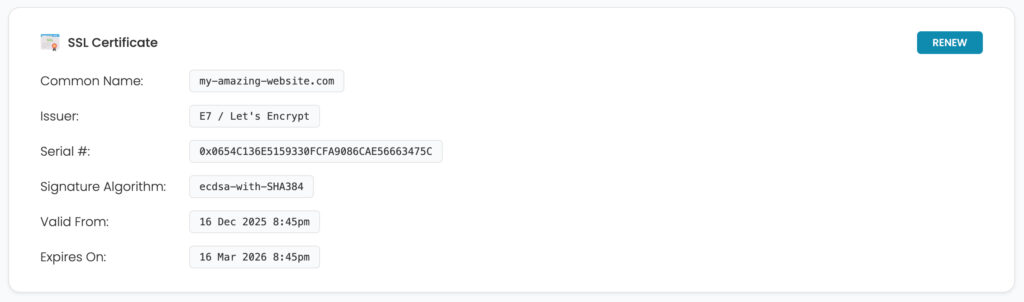
SSL Certificate
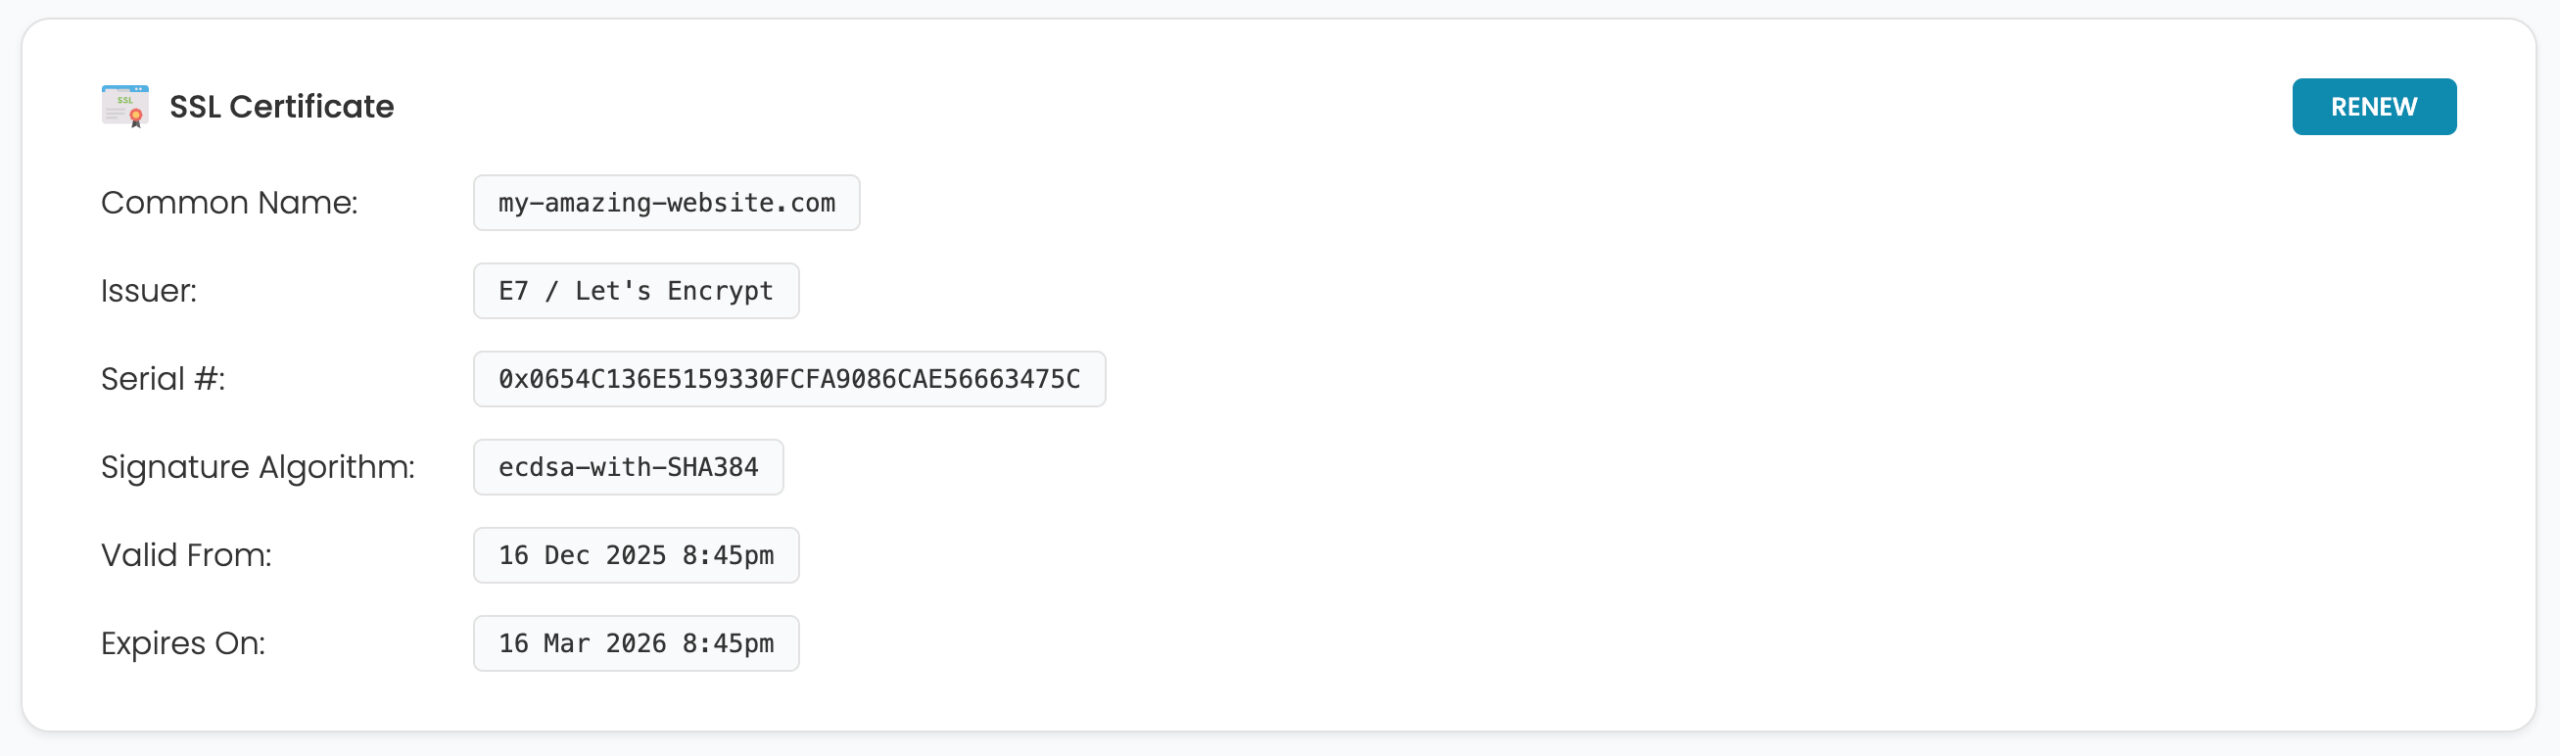
Users can view information about their SSL Certificate on this screen. If they wish to renew the certificate they can do so by pressing the Renew button. A certificate can only be renewed within the renewal period.
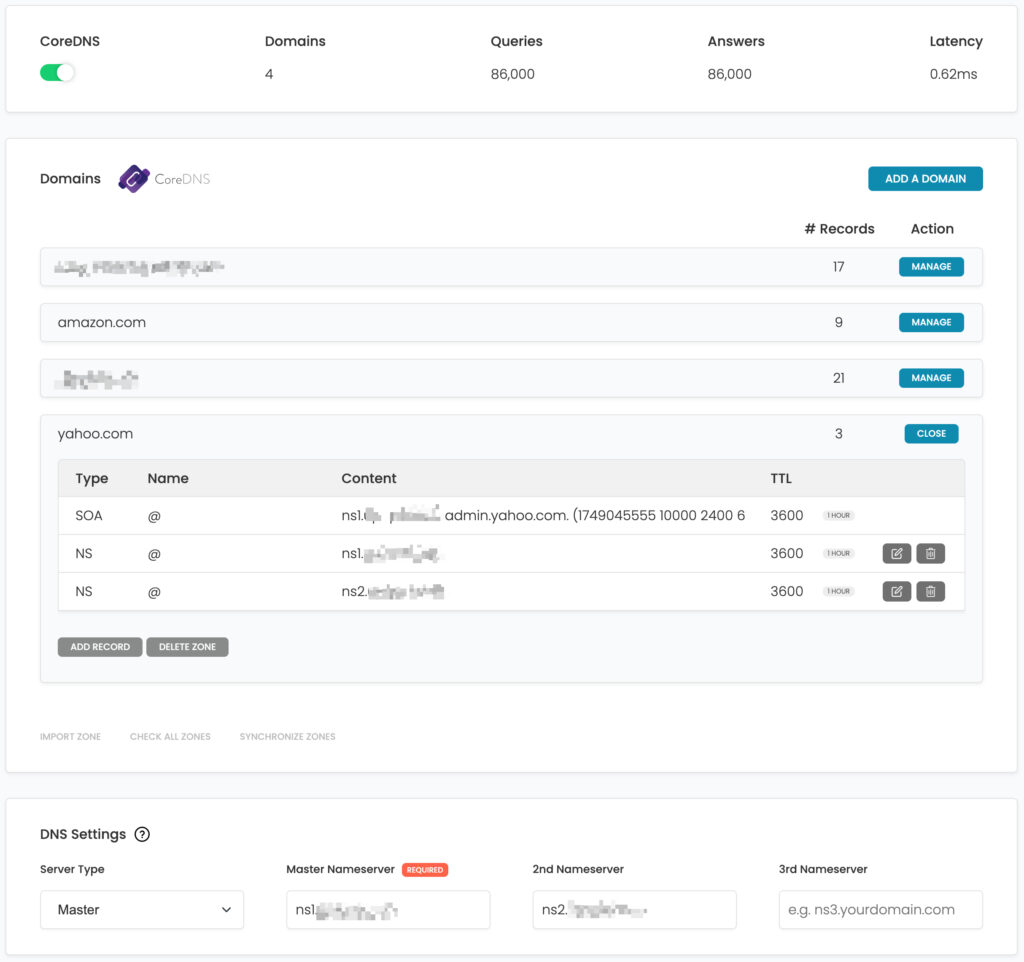
CoreDNS
UPCP has provided the facility for you to create your own nameservers and host/manage the domains. Some great features are:
- For Owners, they will see every website.
- For Customers, they will only see what they have either created or been assigned.
Historical data is only kept for 2 weeks to minimize the monitoring database. An average database size for 2 weeks is ~8MB.
Setting up a second DNS
We've made it super easy to set-up another DNS using UPCP. Follow the following steps to get set-up:

- On the first server with CoreDNS enabled, make sure its Server Type is set to Master.
- To create a second DNS, simply install UPCP again on a fresh server. Take note of it's IP address.
- Register your private nameservers (often referred to as glue records) with your domain registrar.
- Now on the first server, if you have not already, then add your domain.
- Once your domain is added, create two A records within that domain that correspond to your private nameservers. Usually, these are
ns1 and ns2. Make sure ns1 points to your first server's IP Address and ns2 points to your second server's IP Address. - On the first server, on the Domains screen, enter your full name server into the corresponding field i.e. Master Server =
ns1.myhosting.com and 2nd Nameserver = ns2.myhosting.com. The system will attempt to validate and retreive the IP address of the records. If successful, the system will update all the DNS records and use the nameservers going forward. If this fails, please try re-adding them again later. - On the second server, set the Server Type to Slave and add the Master Nameserver.
- If successful, CoreDNS will take over and start synchronizing records between the servers. Synchronization can take 60 seconds.
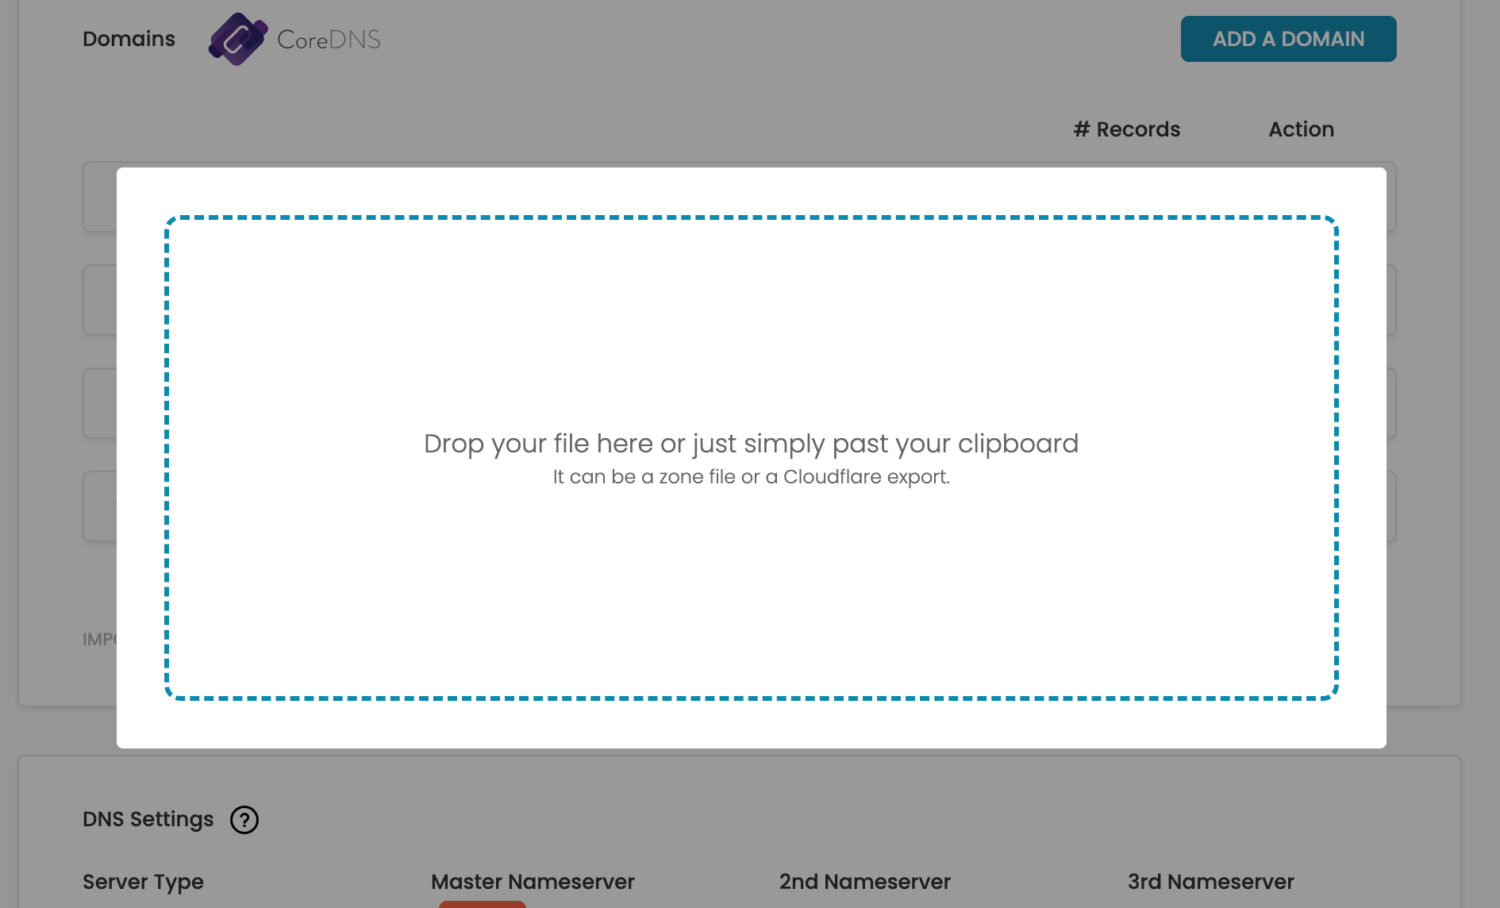
Import Zones
Simply drag/drop or copy/paste (while the pop-up is present) your zone file and UPCP will attempt to parse and import the file. Please double-check the records after import, because some records may not be compatible.

Force synchronization
Click the link Synchronize Zones to force CoreDNS to synchronize all records. Please note, this can take ~60 seconds.
Disable CoreDNS
Use the toggle on the Domains screen to disable CoreDNS.
Overview
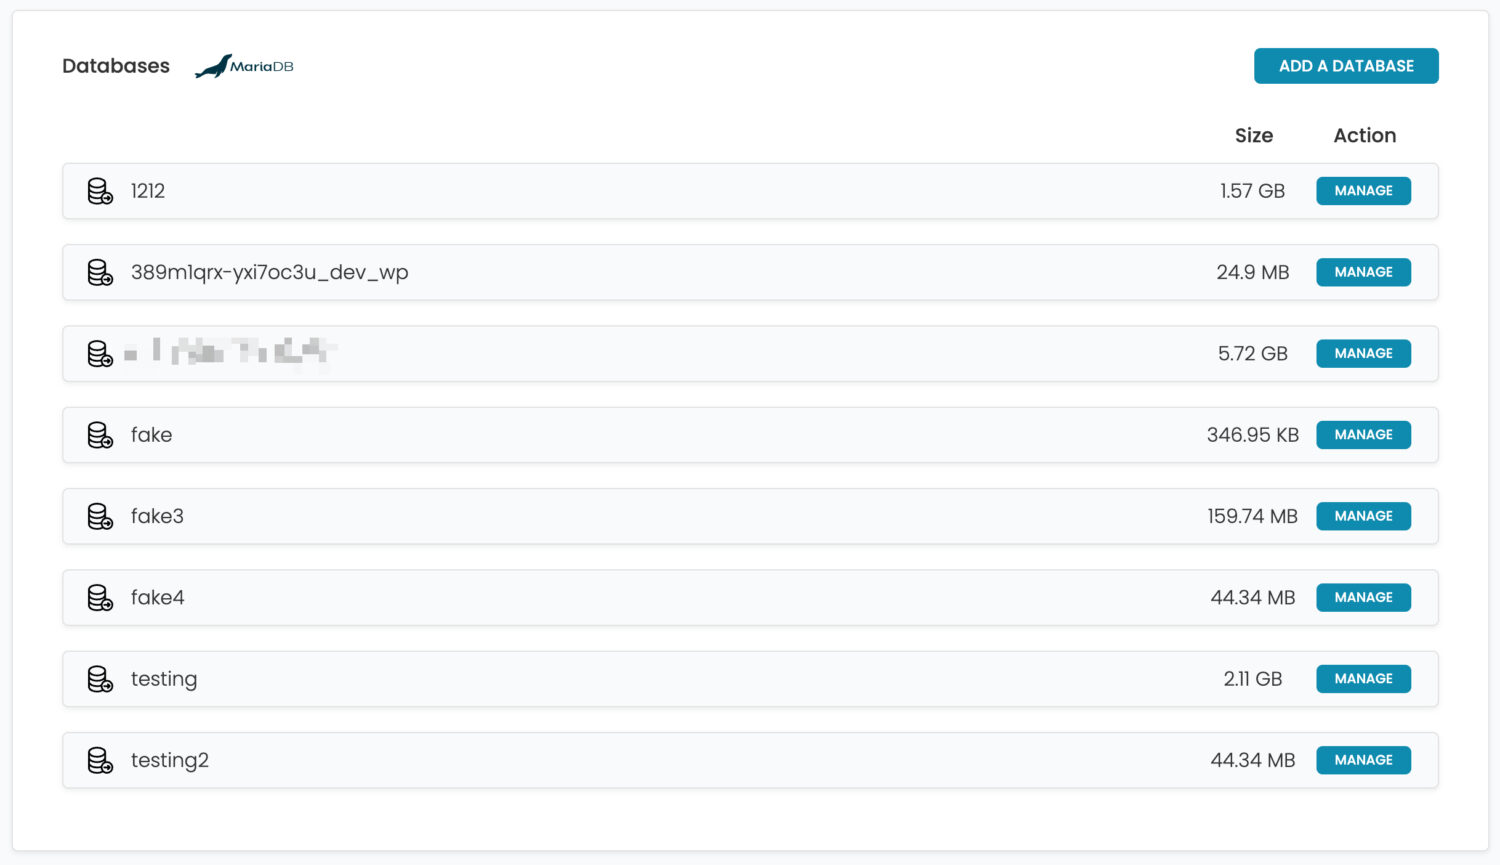
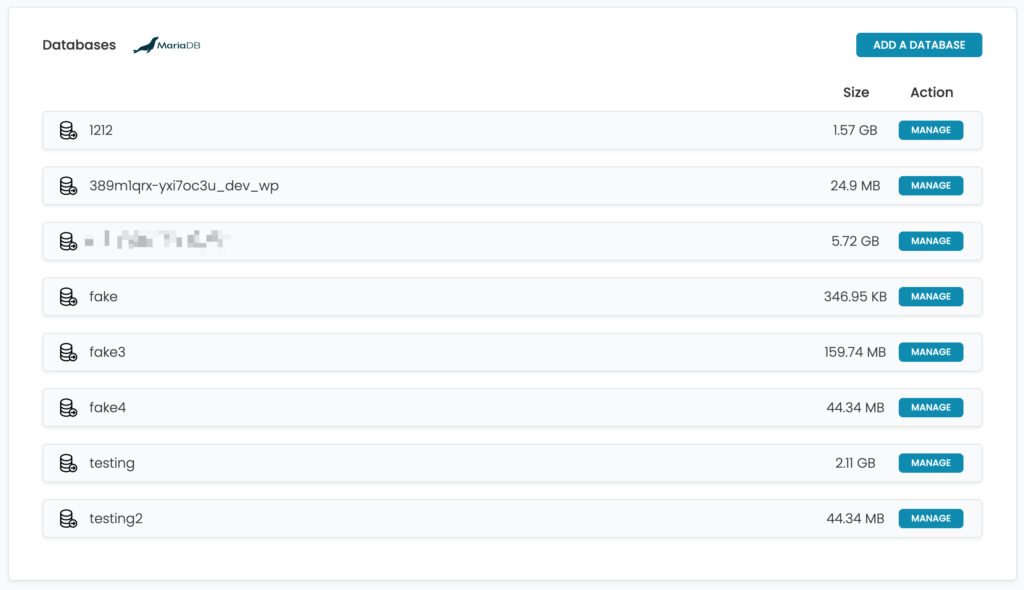
For the database server, we use MariaDB. The Databases provides an overview of what databases are on the system. They include:
- The database name
- The database size
- The ability to download the database
- The ability to upload into the database
Historical data is only kept for 2 weeks to minimize the monitoring database. An average database size for 2 weeks is ~8MB.
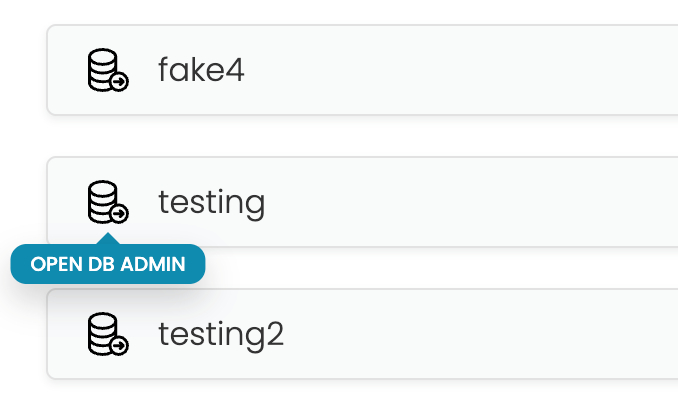
How to open DB Admin
Database administration is a primary part of any system, for this, we use Adminer. To access adminer, click the icon next to any database to access adminer.

MariaDB
The Websites tab enables you to see a list of websites your account can see.
- For Owners, they will see every website.
- For Customers, they will only see what they have either created or been assigned.
Historical data is only kept for 2 weeks to minimize the monitoring database. An average database size for 2 weeks is ~8MB.
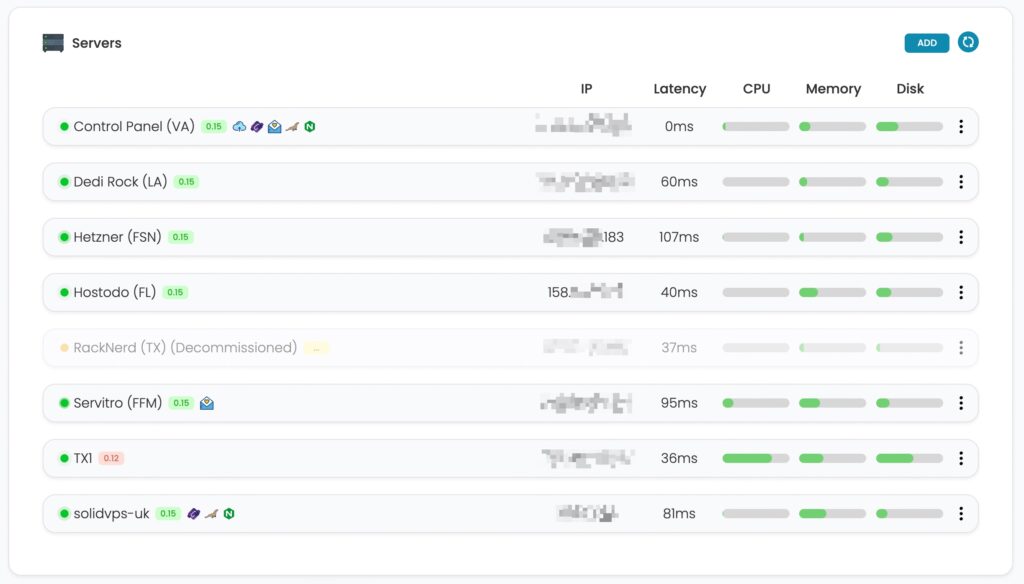
Overview
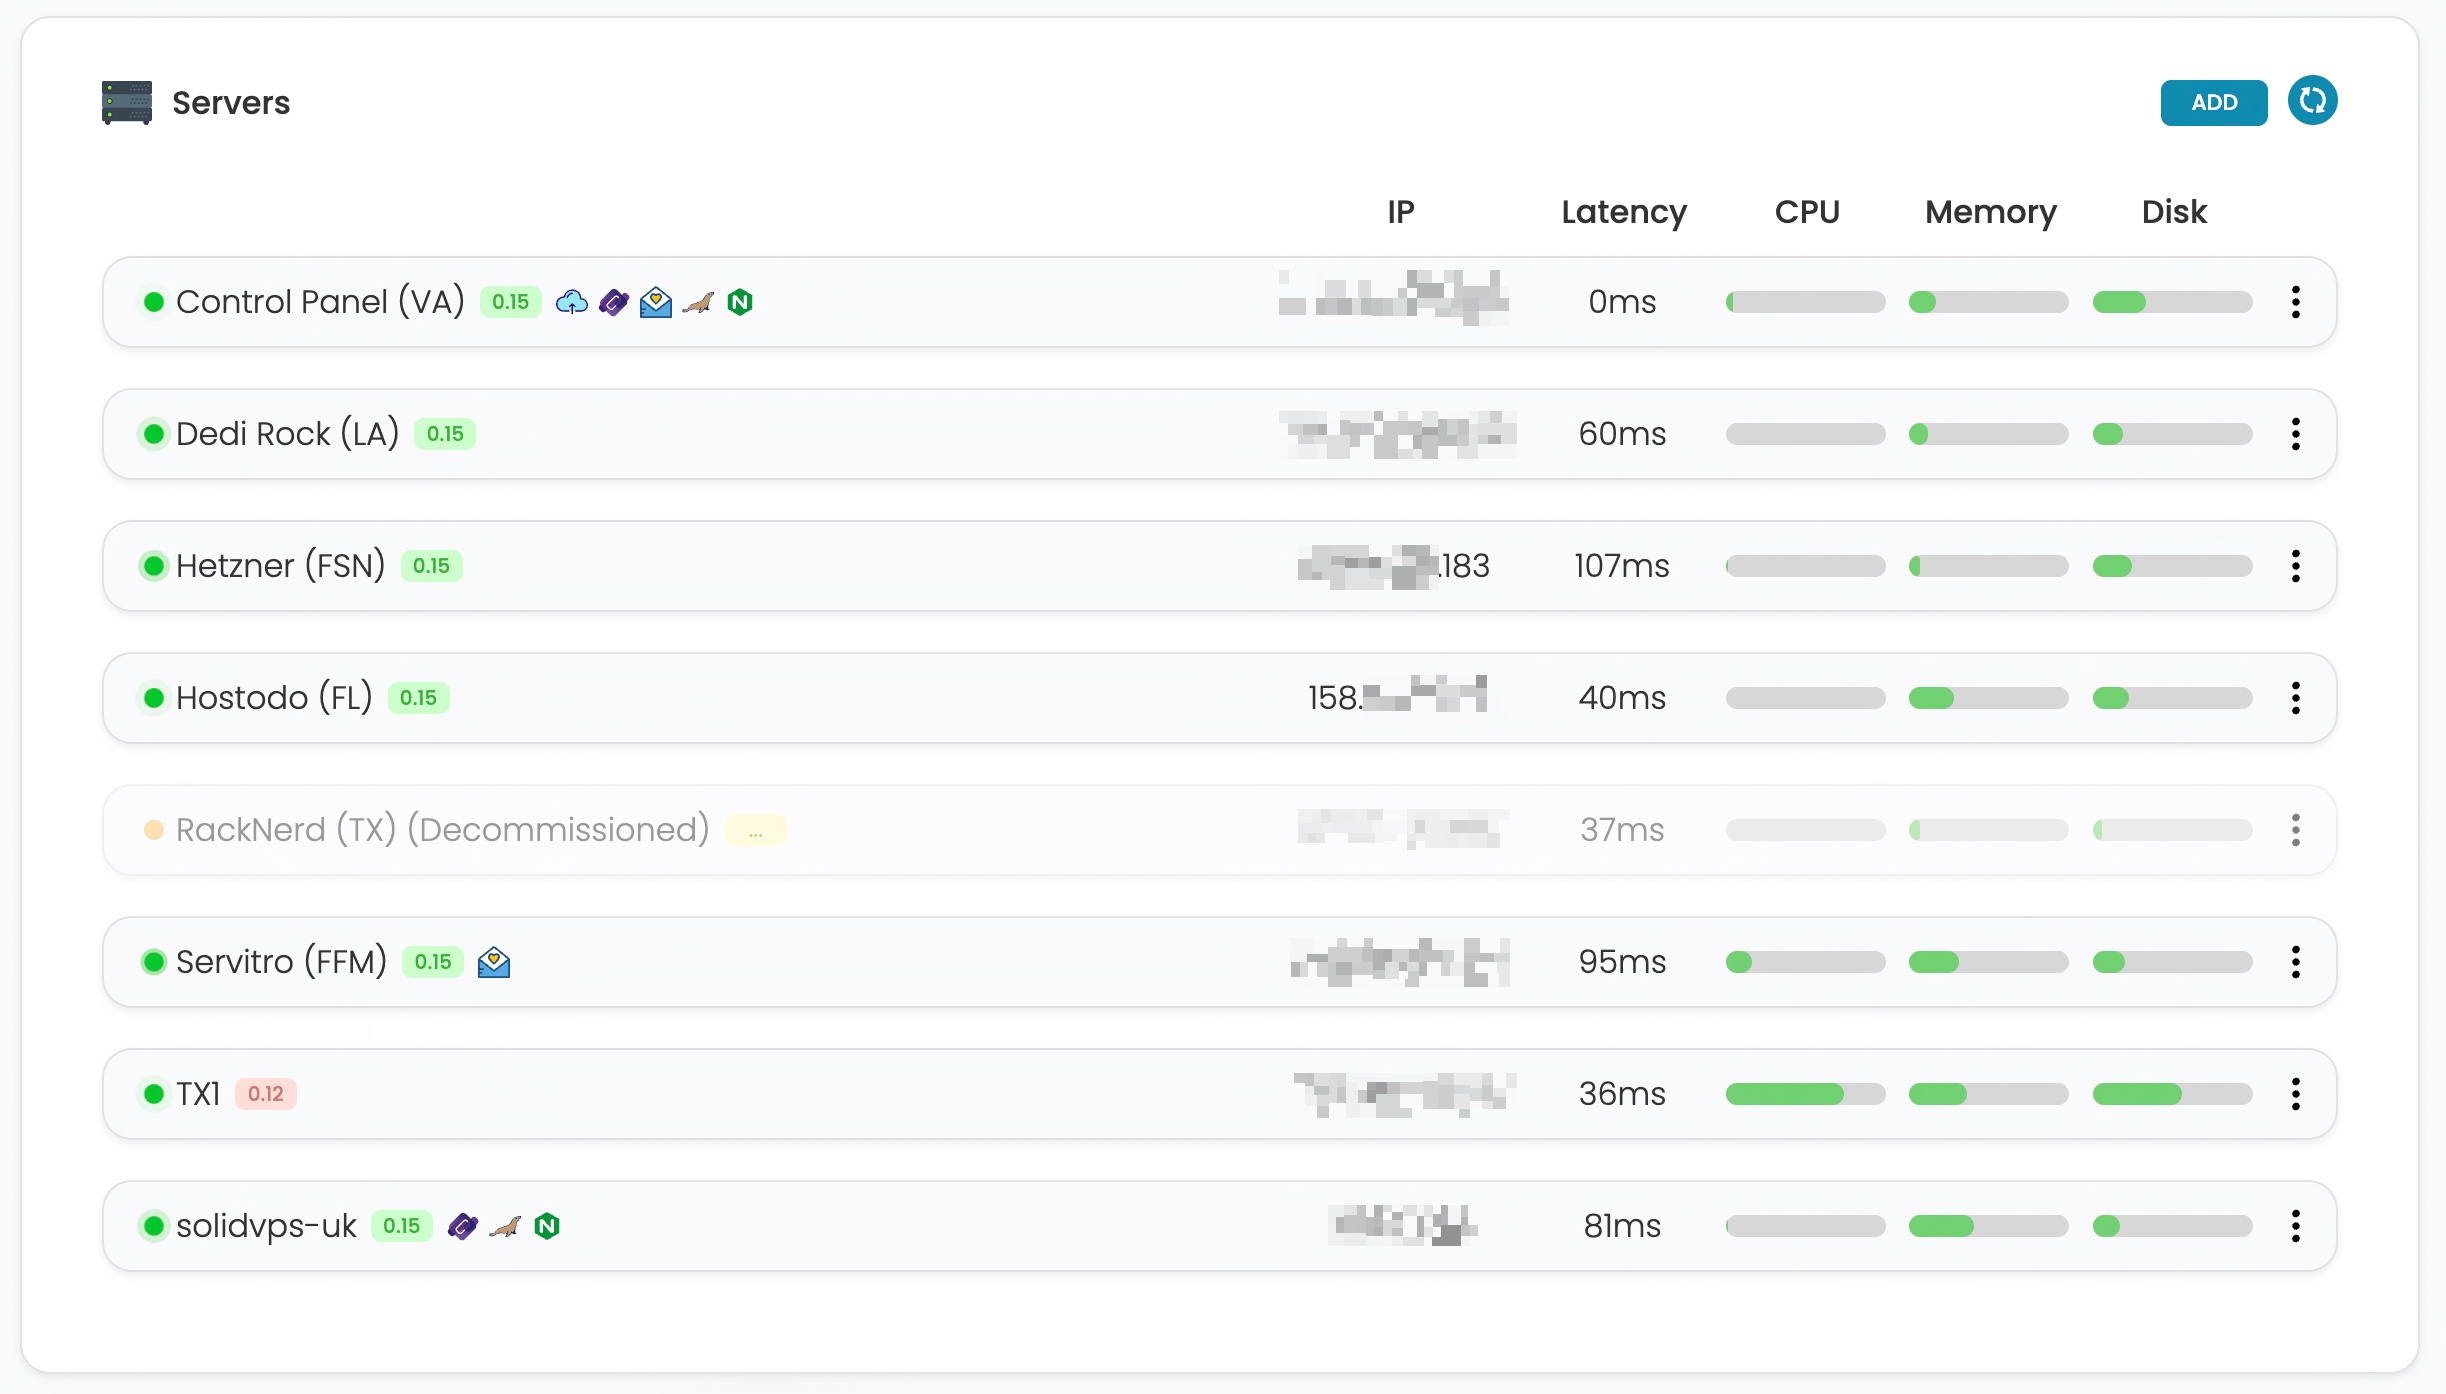
The servers page is an overview of all current servers within your platform. You can quickly see the following information:
- Server name
- UPCP version
- Roles installed
- IP Address
- Latency, CPU Usage, Memory Usage, and Disk Usage
Adding a Server
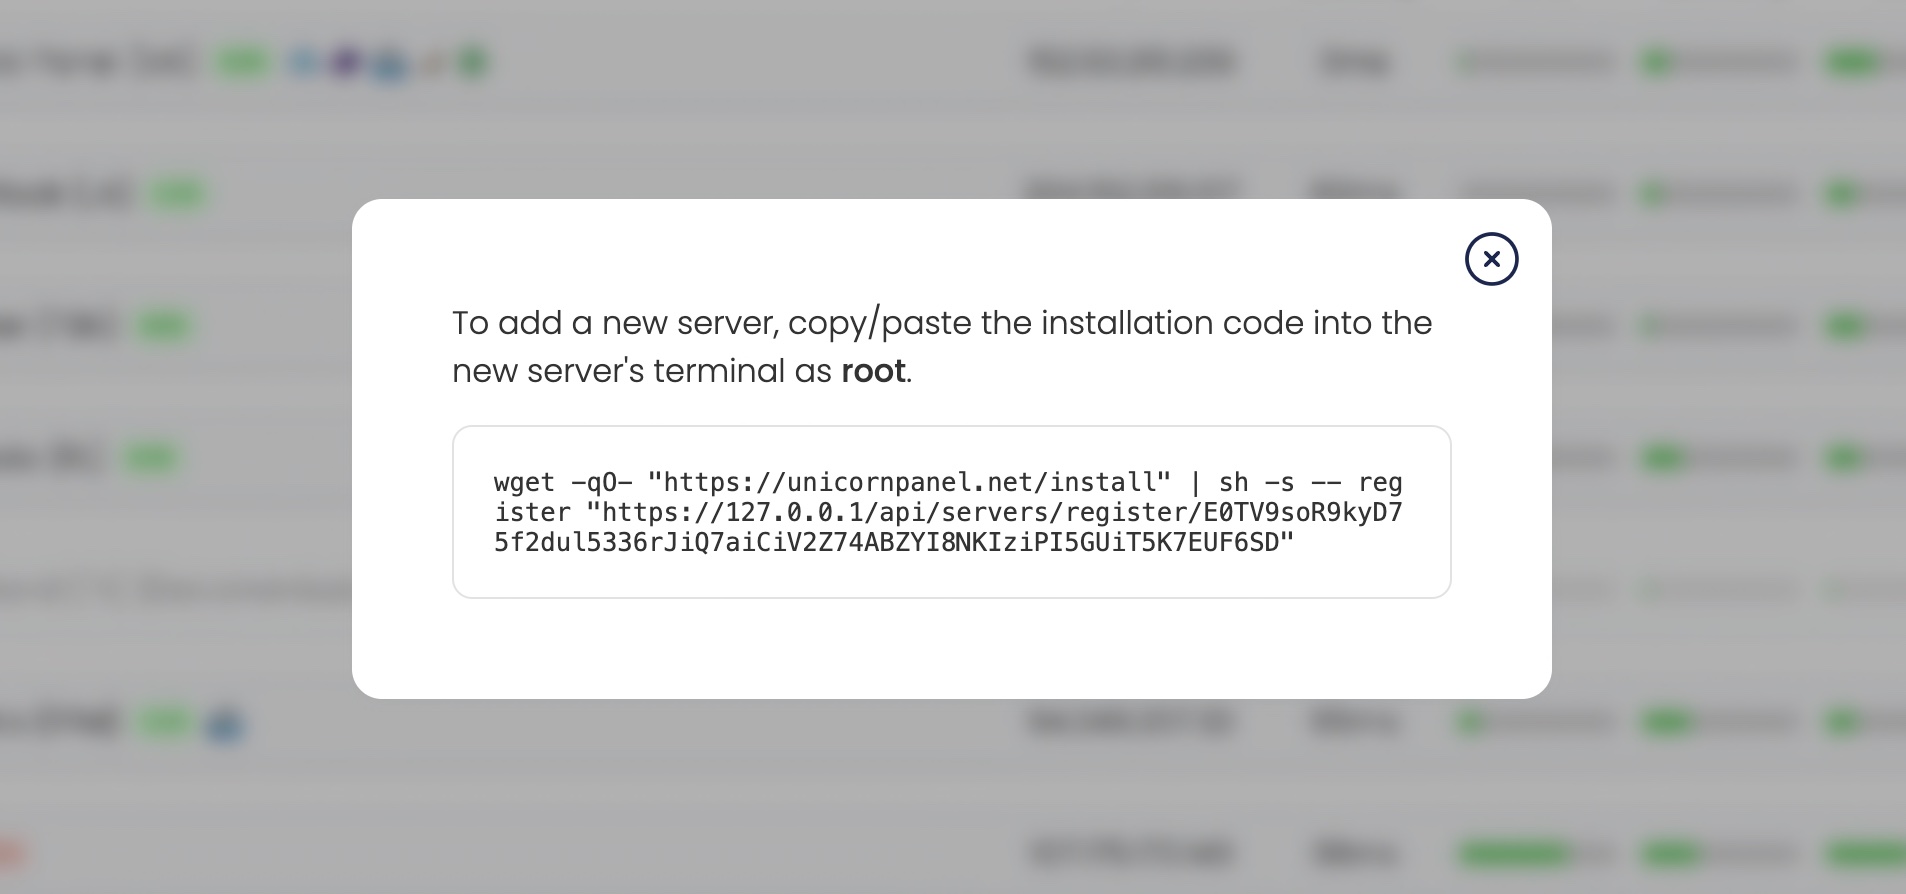
To add a new server to your platform, simply click the Add button towards the top right of the screen. Upon clicking this button, a new modal will pop-up with a unique command you can copy/paste into your new Alpine server.
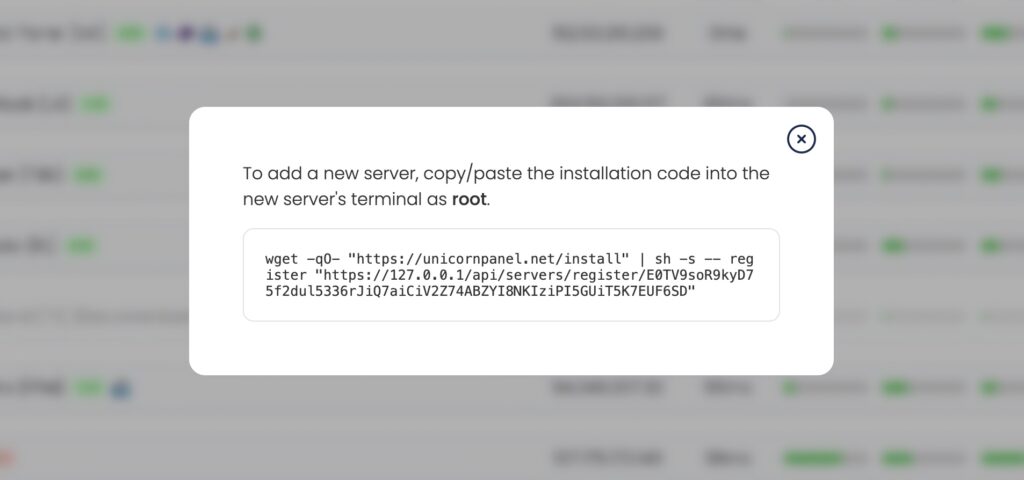
Once you sucessfully run this command on another server, the new server will appear in the Server list. The new server's name will appear as Pending Installation until it has been set up sucessfully. If you make a mistake here, you can also delete the server from this screen using the kebab menu.
Kebab Menu
Each server row has a kebab icon (⋮). When you click this icon, you can access more options:
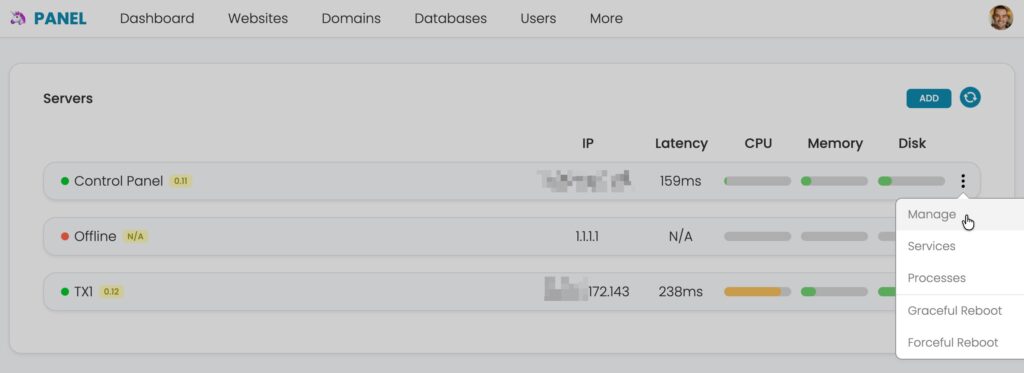
- Manage - To view full details and settings about this individual server
- Processes - View top CPU and Memory processes as well as all running processes.
- Firewall - View blocked IP addresses
- Logs - View all logs for UPCP services
- Graceful Reboot - Gracefully reboot the server
More or less options may be present depending on the server status or future UPCP updates.
Managing a Server
To view full details about a server, set settings, install roles, or manage it, you'll need to access the individual server screen. To do so, go to Admin -> Servers, use the kebab menu and click Manage. This will then load the overview screen for that individual server:
MariaDB
The Websites tab enables you to see a list of websites your account can see.
- For Owners, they will see every website.
- For Customers, they will only see what they have either created or been assigned.
Historical data is only kept for 2 weeks to minimize the monitoring database. An average database size for 2 weeks is ~8MB.
Overview
Security is managed by Fail2Ban and UFW. UPCP has integrated common custom jails to help protect the server from bots and other malicious users.
You can ban and unban IP addresses, view IP address information (by clicking on the IP), and view which jails are banning the most IP addresses.
Fail2Ban
With UPCP our Fail2Ban actions have been refactored to enable quick ban/unban actions.
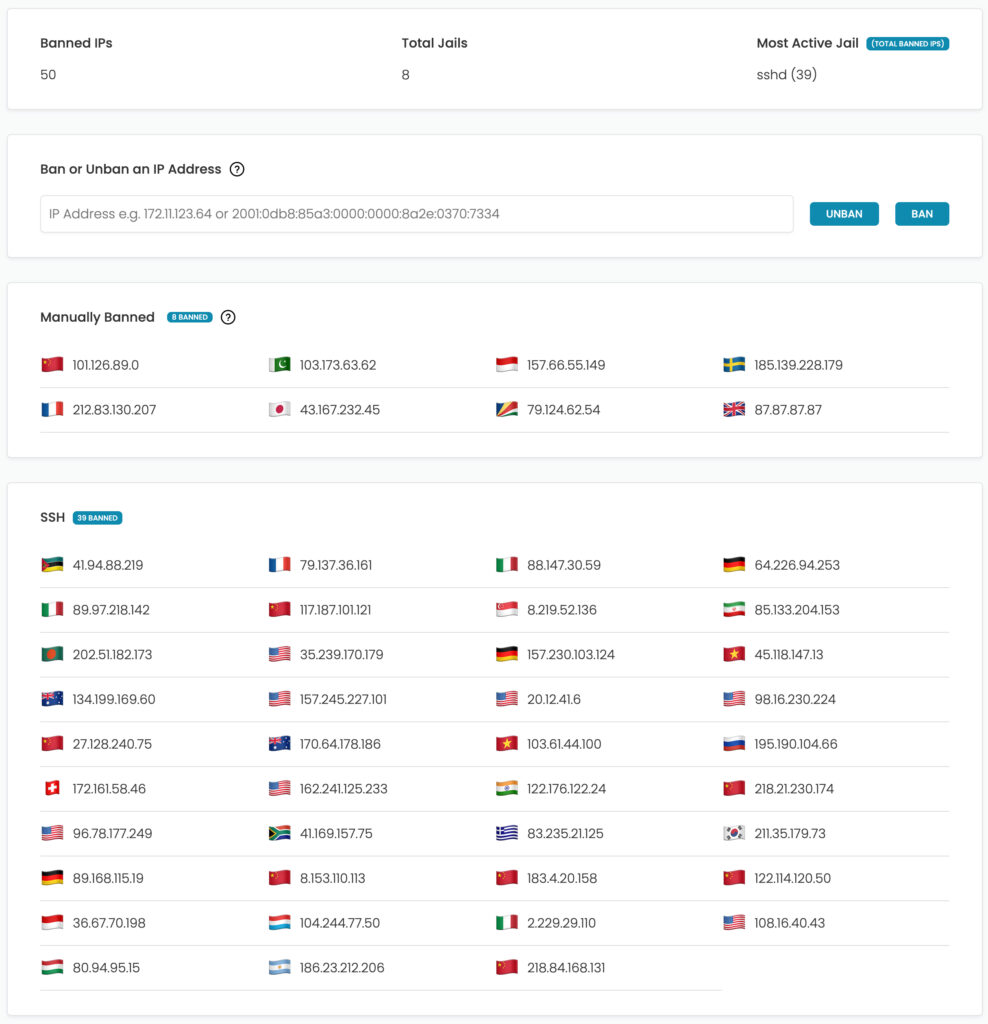
Ban a IP address
To ban an IP address, simply type the IP address in the box provided and click the button labeled Ban. A confirmation screen will pop-up with the result of this action.

Unban an IP address
To unban an IP address, simply type the IP address in the box provided and click the button labeled Unban. A confirmation screen will pop-up with the result of this action.
Adding your own jail
Unicorn Panel will automatically notice when a new jail has been added and add it to the control panel. From there, you can unban the IP addresses.
To rename the jail to a nicer friendlier name, update _config.php and add the following:
$_CONFIG['Firewall']['f2b_to_names'] = [
	'jail-name' => 'Friendly Jail Name'
];
MariaDB
The Websites tab enables you to see a list of websites your account can see.
- For Owners, they will see every website.
- For Customers, they will only see what they have either created or been assigned.
Historical data is only kept for 2 weeks to minimize the monitoring database. An average database size for 2 weeks is ~8MB.
Common Commands
We've listed here a few common commands that we think you'll find helpful when administering your servers.
UPCP Proxy
upcp proxy test - will test the configuration for the proxyupcp proxy restart - will restart the containerupcp proxy reload - will reload NGINX inside the container
Podman / Containers
upcp podman list-containers - will list all containers and their current status (running, stopped, etc)upcp podman restart-containers - will restart all website containersupcp podman recreate-container <UID> - will re-create the container of the website's UID
Recreating containers is genereally safe however, please use this command with caution.
NGINX
upcp nginx test - will test the configuration for NGINXupcp nginx restart - will restart the containerupcp nginx reload - will reload NGINX inside the container
PHP
upcp php test - will test the configuration for every single PHP container
UPCP
upcp upcp cp reload <web|app|cron> - will reload either web, app, or cron of the control panelupcp upcp reset-admin-password - will reset the password of the very first user (ID=1)upcp cron update-cloudflare-ipsupcp cron update-bunnycdn-ipsupcp cron check-common-server-issues - will grep through logs to find common issuesupcp cron run-disk-usage <UID> - will update disk usage of website UID